DIY Bread Dip Recipe in a Jar
# Olive Oil Bread Dip: An Easy and Delicious Appetizer
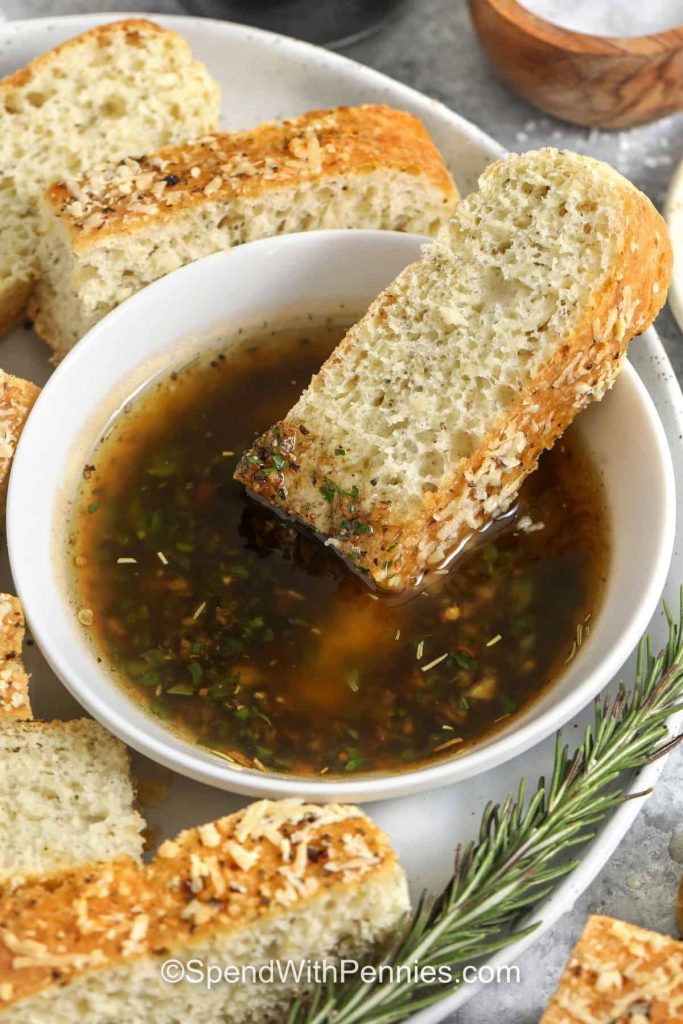
For those who appreciate uncomplicated and tasty appetizers, this olive oil bread dip is whipped up in no time and delivers a restaurant-quality bread basket experience right at home. Allow it to rest while you heat the bread, then just pour and dip.
## Flavor Profile
This dip offers a savory and garlicky essence with a vibrant balsamic tang, hints of Italian herbs, and a delicate nuttiness, particularly enhanced by Parmesan on top.
### Optional Add-Ins
– **Balsamic Glaze**: A drizzle in winter adds a sweet touch.
– **Fresh Lemon Zest**: A sprinkle in summer delivers a bright, refreshing twist.
### Serving Suggestions
Accompany with a warm baguette, focaccia, or crostini for that classic restaurant-style bread basket experience.
## Gather Your Ingredients
– **Olive Oil**: Select a flavorful, everyday extra virgin olive oil. If it has a strong peppery taste, blend it with a dash of milder olive oil.
– **Balsamic Vinegar**: Keeps the dip light and tangy; a balsamic glaze contributes sweetness.
– **Italian Seasoning**: A convenient way to achieve that “restaurant-style” flavor; substitute with a mix of oregano and basil if needed.
– **Garlic**: Fresh minced garlic provides the most intense flavor; for a smoother consistency, opt for garlic powder.
– **Parsley**: Fresh offers a vibrant look; dried is suitable year-round.
## Variations
– **Spicy Kick**: Incorporate a pinch of red pepper flakes for some heat.
– **Mediterranean Twist**: Mix in chopped sun-dried tomatoes or olives for added texture.
– **Citrus Bright**: Finish with a dash of lemon zest for freshness.
## How to Prepare Olive Oil Bread Dip
1. In a jar, combine all the ingredients (complete recipe below).
2. Shake and let it rest at room temperature for up to 2 hours.
3. Shake once more right before serving and pour into a shallow bowl, accompanied by warm bread.
### Tips for the Ideal Dish
– Utilize a shallow dish to ensure that the bread captures all the herbs and garlic with each dip.
– Slightly warm the bread to help it absorb the oil without feeling overly heavy.
– For a smoother texture, use dried parsley and garlic powder instead of fresh garlic.
– Top with flaky salt and extra black pepper for more “restaurant” appeal.
– Store leftovers promptly in the refrigerator; do not let garlic-in-oil mixtures sit at room temperature too long.
– Double the amounts for gatherings, maintaining the same wide dish presentation.
## How to Keep Leftovers
Store any leftovers in an airtight container in the refrigerator for up to 4 days. The oil may solidify when chilled, so allow it to rest at room temperature for a few minutes, then shake well before serving. Freeze in small portions for longer storage. Keep the bread separate and toast it for rejuvenation.
### Nutritional Information (Per Serving)
– **Calories**: 331
– **Carbohydrates**: 2g
– **Protein**: 1g
– **Fat**: 36g
– **Sodium**: 170mg
– **Cholesterol**: 1mg
### Recipe Overview
– **Servings**: 4
– **Prep Time**: 5 minutes
– **Total Time**: 35 minutes
### Ingredients
– Olive oil
– Balsamic vinegar
– Garlic
– Parsley
– Italian seasoning
– Salt and pepper
### Instructions
1. In a jar with a lid, combine oil, balsamic, garlic, parsley, Italian seasoning, salt, and pepper.
2. Shake well to mix and allow to sit at room temperature for 30 minutes or up to 2 hours.
3. When ready to serve, shake well and pour into a shallow bowl or dish.
4. Optionally garnish with grated Parmesan cheese.
5. Serve with a fresh loaf of bread, like a baguette or focaccia, for dipping.
Savor this delightful olive oil bread dip as an appetizer or a crowd-pleaser at your next gathering!
Homemade Pierogi Garnished with Buttery Onions
### Homemade Pierogi: A Family Treasure from Grandma Mary’s Kitchen
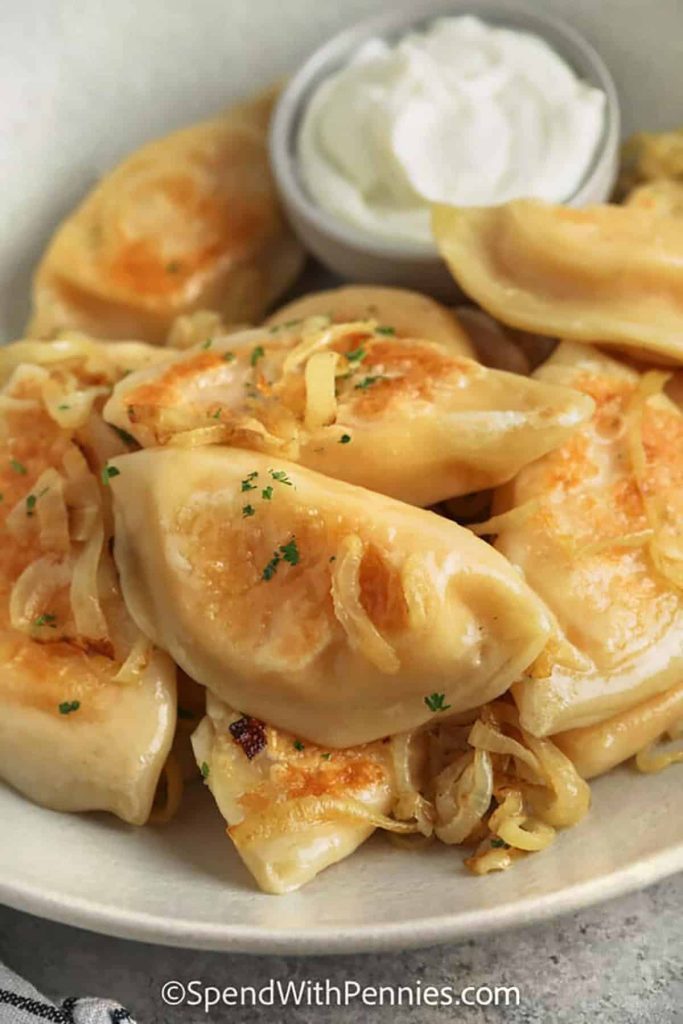
These homemade pierogi are a treasured recipe handed down from my Grandma Mary. The delicate dough is stuffed with a savory blend of creamy mashed potatoes and cheese, boiled to perfection, and then pan-fried until golden and crispy. Serve them alongside caramelized onions and a spoonful of sour cream for a delightful side or main dish that captures the spirit of comfort food.
#### What Are Pierogi?
Pronounced ‘puh-row-gee’, pierogi (also spelled pierogie, perogie, or perogy) are a cornerstone of Polish cuisine and a cherished dish throughout Eastern Europe. These dumplings start with a simple flour dough and can be filled with an array of ingredients, from sweet options like blueberries to savory ones such as sauerkraut. The traditional cooking method involves boiling the pierogi until they float, followed by a quick pan-fry to create a crisp outer layer.
This recipe highlights the classic potato and cheese filling, known as pierogi ruskie, which my grandma frequently prepared for our family celebrations. They are best enjoyed with sour cream and caramelized onions.
#### Ingredient Notes
– **Dough**: For the ideal texture, stick to the original ingredients in the dough. This recipe, used by my Polish grandma, does not call for sour cream, ensuring a classic consistency.
– **Filling**: The filling comprises smooth mashed potatoes, cheddar cheese, and finely diced sautéed onions.
– **Potatoes**: Choose starchy types like russet or baking potatoes for a creamy texture.
– **Cheese**: Go for finely shredded cheddar, preferably freshly shredded from a block for enhanced flavor.
– **Seasonings**: Finely dice the white onion and cook it in butter until soft, without letting it brown. My grandma preferred white pepper for a delicate taste, but black pepper is also suitable.
#### How to Make Pierogi
Crafting pierogi is a cherished tradition that can be an enjoyable family activity. Here’s how to do it:
1. **Make the Dough**: Mix flour, eggs, oil, salt, and water in a bowl, stirring until a dough forms. Knead gently until it’s smooth, then let it rest.
2. **Prepare the Filling**: Boil the potatoes until they are tender, sauté the onions in butter, then mash the potatoes and combine them with the onions and cheese. Let the filling cool.
3. **Roll the Dough**: Roll the dough out to 1/8-inch thickness and cut into 3-inch circles.
4. **Fill and Seal**: Spoon a portion of the filling onto each circle, fold it over, and pinch the edges to seal.
#### Cooking and Freezing Pierogi
– **Cooking**: Boil the pierogi in salted water until they float, then pan-fry in butter until golden brown. Serve with sautéed onions and sour cream.
– **Freezing**: Prepare the pierogi and freeze them on a parchment-lined baking sheet. Once they are frozen, transfer them to a zippered bag. They can be cooked straight from frozen.
#### Tips for the Best Pierogi
– Make sure the potatoes are mashed until smooth for a creamy filling.
– Shred your own cheese to maximize flavor.
– Sauté the onions gently to prevent browning.
– Avoid overworking the dough; knead just until it’s smooth.
– Let the dough rest if it springs back while rolling.
#### Conclusion
These homemade pierogi are not merely a dish; they represent a link to family traditions and cherished memories. Whether enjoyed as a side dish or a main meal, they are bound to be a favorite at your table. Relish the experience of making them with your loved ones, just as my grandma did with me.
Honey Butter Coated Carrots: An Easy and Tasty Easter Accompaniment
**Honey Butter Glazed Carrots: A Simple and Yummy Easter Accompaniment**
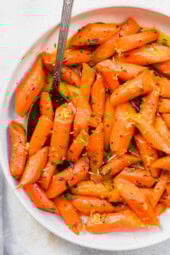
Easter signifies moments of family reunions, joyful festivities, and certainly, scrumptious dishes. As you curate your Easter offerings, think about incorporating a recipe that is easy to make and guaranteed to please your visitors: Honey Butter Glazed Carrots. This side dish fuses the inherent sweetness of carrots with the decadent flavors of honey and butter, forming an ideal complement to any Easter meal.
**Why Select Honey Butter Glazed Carrots?**
Carrots are a flexible vegetable that not only provide nutrition but also bring a lively touch of color to your dining table. Packed with beta-carotene, fiber, and antioxidants, they are a wholesome choice that pairs well with numerous main courses. The honey butter glaze accentuates their natural sweetness, making them appealing for both adults and kids.
**Ingredients Needed:**
– 1 pound of fresh carrots, peeled and cut into similar-sized pieces
– 3 tablespoons of unsalted butter
– 2 tablespoons of honey
– Salt and pepper for seasoning
– Fresh parsley or thyme for decoration (optional)
**Preparation Steps:**
1. **Prepare the Carrots:** Start by peeling the carrots and slicing them into similar-sized pieces. This guarantees consistent cooking and an attractive presentation.
2. **Cook the Carrots:** Bring a pot of salted water to a boil. Add the carrots and cook for approximately 5-7 minutes, or until they reach tenderness but remain firm. Drain the carrots and keep them aside.
3. **Create the Glaze:** In a large skillet, melt the butter over medium flame. Mix in the honey until it is thoroughly blended with the butter. Let the mixture simmer for a minute or two until it begins to slightly thicken.
4. **Glaze the Carrots:** Introduce the cooked carrots to the skillet, gently tossing them to ensure they are evenly coated with the honey butter glaze. Season with salt and pepper as desired. Continue to cook for an additional 2-3 minutes, allowing the carrots to soak up the flavors of the glaze.
5. **Serve and Garnish:** Move the glazed carrots to a serving platter. For a refreshing touch, garnish with chopped parsley or thyme.
**Success Tips:**
– **Even Sizing:** Slicing the carrots into uniform pieces guarantees even cooking, avoiding some being overcooked while others are underdone.
– **Sweetness Adjustment:** If you prefer a less sweet flavor, cut back on the honey or add a dash of lemon juice for a touch of acidity.
– **Prepare in Advance:** This dish can be made ahead of time. Simply reheat gently in a skillet before serving to keep the glaze smooth.
**Pairing Ideas:**
Honey Butter Glazed Carrots complement a range of main courses beautifully. Think about serving them with roasted lamb, baked ham, or a savory quiche. Their sweet and buttery essence also pairs well with other classic Easter sides like mashed potatoes or green beans.
**Final Thoughts:**
Honey Butter Glazed Carrots are a charming addition to any Easter spread. Their simple preparation and delightful flavor make them a beloved choice for home chefs and guests alike. This year, bring a hint of sweetness to your Easter gathering with this uncomplicated yet sophisticated side dish.
Creamy Pasta with Chicken and Cowboy Butter Sauce
**Creamy Cowboy Butter Chicken Pasta**
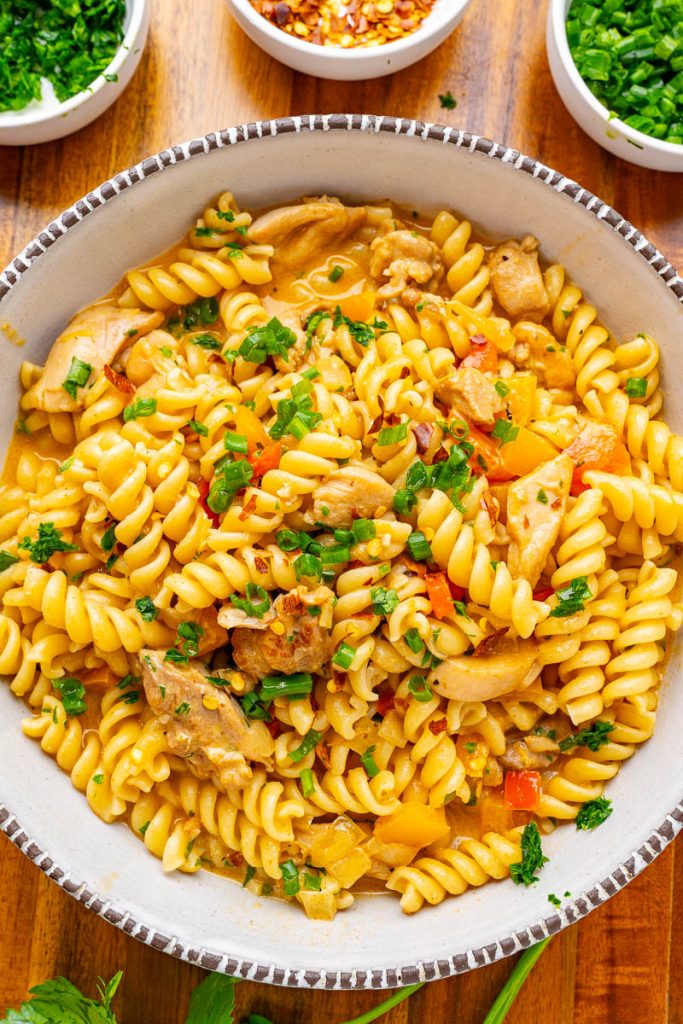
A swift and simple chicken pasta bursting with the flavors of cowboy butter! Cowboy butter is a compound butter filled with garlic, parsley, chives, thyme, lemon juice, Dijon mustard, paprika, and chili flakes, making it delightful on steaks, bagels, and more. It also serves as a delicious sauce for pasta! This recipe captures all the essence of cowboy butter and is incredibly easy to prepare. The process begins with cooking seasoned chicken (in butter), then setting it aside while you sauté onions and peppers. Garlic, thyme, paprika, and red pepper flakes are incorporated before creating the sauce with broth and cream. The finishing touches include Dijon mustard, lemon juice, parsley, and chives, followed by mixing in the pasta for a delightful meal! This creamy cowboy butter chicken pasta is quick and easy to prepare, making it ideal for hectic weeknights and is loaded with flavor; sure to vanish rapidly from plates!
**Prep Time**: 10 minutes
**Cook Time**: 25 minutes
**Total Time**: 35 minutes
**Servings**: 4
**Ingredients:**
– 8 ounces pasta (gluten-free for gluten-free)
– 2 tablespoons butter
– 1 pound boneless and skinless chicken thighs (or breasts), diced into bite-sized pieces
– 1/2 teaspoon onion powder
– 1/2 teaspoon garlic powder
– 1/2 teaspoon (smoked) paprika
– 1/2 teaspoon salt
– 1/2 teaspoon pepper
– 1/4 cup butter
– 1 onion, chopped
– 1 bell pepper, chopped
– 2 cloves garlic minced/grated
– 1 teaspoon thyme, chopped
– 1 teaspoon (smoked) paprika
– 1/2 teaspoon red pepper flakes
– 1 cup chicken broth
– 1/2 cup heavy/whipping cream
– 1 tablespoon Dijon mustard
– 1/2 lemon, juice and zest
– 1 tablespoon parsley, chopped
– 1 tablespoon chives, chopped
– Salt and pepper to taste
**Directions:**
1. Begin cooking the pasta as per the package instructions.
2. In the meantime, melt the butter in a large skillet over medium heat, add the chicken, seasoned with onion powder, garlic powder, paprika, salt, and pepper, and cook for about 10 minutes before removing it from the pan.
3. Incorporate the onion and bell pepper into the skillet and cook until soft, roughly 5-8 minutes.
4. Add the garlic, thyme, paprika, and red pepper flakes, stir, and cook until aromatic, about a minute.
5. Pour in 1/2 cup of the broth and deglaze the pan by scraping any browned bits from the bottom as the broth bubbles.
6. Add the rest of the broth and cream, bring to a boil, then lower the heat and let simmer for 5 minutes.
7. Stir in the Dijon mustard, lemon juice, lemon zest, parsley, and chives before adjusting seasoning with salt and pepper to taste.
8. Combine the cooked and drained pasta and relish your meal!
**Options:**
– Sauté the onion and bell pepper at the same time as the chicken to save a few minutes!
– Turn this into a one-pan dish by incorporating an additional 2 cups of broth in step 6 and cooking the pasta in the pan until done, approximately 10 minutes.
– Mix in 1 tablespoon Worcestershire sauce (gluten-free for gluten-free), together with the broth.
– Incorporate 1/4 cup Parmigiano Reggiano (parmesan cheese), grated, along with the cream.
**Nutrition Facts**: Calories 557, Fat 34g (Saturated 19g, Trans 0.3g), Cholesterol 187mg, Sodium 545mg, Carbs 53g (Fiber 4g, Sugars 6g), Protein 33g.

Banana Chocolate Chip Cake Instructions
### Banana Chocolate Chip Cake: A Tasty Variation on a Timeless Recipe
As we look back on almost twenty years since the launch of a cherished family dish, the Chocolate Chip Sour Cream Cake, a wonderful transformation has taken place: the Banana Chocolate Chip Cake. This dessert preserves the core qualities of its forerunner while infusing the cozy, inviting taste of bananas, rendering it an irresistible indulgence for any celebration.
#### The Motive Behind the Recipe
The initial Chocolate Chip Sour Cream Cake is celebrated for its high, soft texture and a crunchy layer of cinnamon sugar on top, enhanced by a generous distribution of chocolate chips. Throughout the years, the thought of modifying this traditional recipe has remained in the creator’s mind, prompting the investigation of different flavors like pumpkin and apple spice. However, it was a moment of necessity—running short on sour cream—that inspired the creative use of mashed bananas, resulting in an overwhelmingly favorable reaction from family and friends.
This revised version of the cake not only retains the cherished traits of the original but also amplifies it with the aromatic and warming undertones of banana. It’s an ideal answer for those overripe bananas resting on your counter, turning them into a delightful dessert that’s bound to be a family favorite.
#### Ingredients
**For the Cake:**
– 3 large eggs, separated
– ½ cup (4 ounces or 115 grams) unsalted butter, at room temperature
– 1½ cups (300 grams) granulated sugar
– 1½ teaspoons vanilla extract
– 1½ cups (375 grams) mashed bananas
– ⅔ cup (160 grams) sour cream
– 3 cups (400 grams) all-purpose flour
– ½ teaspoon ground cinnamon
– 1 teaspoon baking powder
– 1½ teaspoons baking soda
– 1½ teaspoons kosher salt
**For the Filling and Topping:**
– 2 cups (12 ounces or 340 grams) semi- or bittersweet chocolate chips
– ½ cup (100 grams) granulated sugar
– 1 teaspoon ground cinnamon
#### Instructions
1. **Preheat the Oven:** Preheat your oven to 350°F (175°C). Prepare a 9×13-inch baking dish by applying nonstick spray and lining the base with parchment paper.
2. **Prepare the Batter:** In a large bowl, whip the egg whites until they form firm peaks and set aside. In another mixing bowl, cream together the butter and 1½ cups of the granulated sugar until light and fluffy. Incorporate the egg yolks and vanilla extract, mixing until well combined.
3. **Combine Dry Ingredients:** In a separate bowl, mix together the flour, baking soda, baking powder, ½ teaspoon of cinnamon, and salt.
4. **Mix Ingredients:** Blend the mashed bananas into the butter mixture until combined. Gradually introduce half of the flour mixture, then add the sour cream, followed by the remaining flour mixture, mixing until just integrated. Gently fold in the whipped egg whites.
5. **Assemble the Cake:** In a small bowl, mix the leftover ½ cup of granulated sugar and 1 teaspoon of cinnamon. Spread half of the batter evenly in the prepared dish. Sprinkle with half of the cinnamon-sugar mixture and 1 cup of chocolate chips. Dollop the remaining batter over the filling and smooth the top. Finish by sprinkling the rest of the cinnamon-sugar and chocolate chips over the top.
6. **Bake the Cake:** Bake for 35 to 40 minutes, or until a tester inserted into the center comes out clean. Allow the cake to cool in the pan.
7. **Serve:** Once cooled, move the cake to a cutting board and slice it into squares. For optimal results, store the cake at room temperature uncovered to keep the crispy cinnamon-sugar topping.
#### Conclusion
The Banana Chocolate Chip Cake is a delightful modification that revitalizes a classic recipe. Its moist texture, rich flavor, and appealing presentation make it a perfect dessert for gatherings or a simple family treat. Seize the chance to use those ripe bananas and craft a cake that is sure to become a treasured favorite in your household.

DIY Bread Dip Recipe in a Jar
# Olive Oil Bread Dip: An Easy and Delicious Appetizer
For those who appreciate uncomplicated and tasty appetizers, this olive oil bread dip is whipped up in no time and delivers a restaurant-quality bread basket experience right at home. Allow it to rest while you heat the bread, then just pour and dip.
## Flavor Profile
This dip offers a savory and garlicky essence with a vibrant balsamic tang, hints of Italian herbs, and a delicate nuttiness, particularly enhanced by Parmesan on top.
### Optional Add-Ins
– **Balsamic Glaze**: A drizzle in winter adds a sweet touch.
– **Fresh Lemon Zest**: A sprinkle in summer delivers a bright, refreshing twist.
### Serving Suggestions
Accompany with a warm baguette, focaccia, or crostini for that classic restaurant-style bread basket experience.
## Gather Your Ingredients
– **Olive Oil**: Select a flavorful, everyday extra virgin olive oil. If it has a strong peppery taste, blend it with a dash of milder olive oil.
– **Balsamic Vinegar**: Keeps the dip light and tangy; a balsamic glaze contributes sweetness.
– **Italian Seasoning**: A convenient way to achieve that “restaurant-style” flavor; substitute with a mix of oregano and basil if needed.
– **Garlic**: Fresh minced garlic provides the most intense flavor; for a smoother consistency, opt for garlic powder.
– **Parsley**: Fresh offers a vibrant look; dried is suitable year-round.
## Variations
– **Spicy Kick**: Incorporate a pinch of red pepper flakes for some heat.
– **Mediterranean Twist**: Mix in chopped sun-dried tomatoes or olives for added texture.
– **Citrus Bright**: Finish with a dash of lemon zest for freshness.
## How to Prepare Olive Oil Bread Dip
1. In a jar, combine all the ingredients (complete recipe below).
2. Shake and let it rest at room temperature for up to 2 hours.
3. Shake once more right before serving and pour into a shallow bowl, accompanied by warm bread.
### Tips for the Ideal Dish
– Utilize a shallow dish to ensure that the bread captures all the herbs and garlic with each dip.
– Slightly warm the bread to help it absorb the oil without feeling overly heavy.
– For a smoother texture, use dried parsley and garlic powder instead of fresh garlic.
– Top with flaky salt and extra black pepper for more “restaurant” appeal.
– Store leftovers promptly in the refrigerator; do not let garlic-in-oil mixtures sit at room temperature too long.
– Double the amounts for gatherings, maintaining the same wide dish presentation.
## How to Keep Leftovers
Store any leftovers in an airtight container in the refrigerator for up to 4 days. The oil may solidify when chilled, so allow it to rest at room temperature for a few minutes, then shake well before serving. Freeze in small portions for longer storage. Keep the bread separate and toast it for rejuvenation.
### Nutritional Information (Per Serving)
– **Calories**: 331
– **Carbohydrates**: 2g
– **Protein**: 1g
– **Fat**: 36g
– **Sodium**: 170mg
– **Cholesterol**: 1mg
### Recipe Overview
– **Servings**: 4
– **Prep Time**: 5 minutes
– **Total Time**: 35 minutes
### Ingredients
– Olive oil
– Balsamic vinegar
– Garlic
– Parsley
– Italian seasoning
– Salt and pepper
### Instructions
1. In a jar with a lid, combine oil, balsamic, garlic, parsley, Italian seasoning, salt, and pepper.
2. Shake well to mix and allow to sit at room temperature for 30 minutes or up to 2 hours.
3. When ready to serve, shake well and pour into a shallow bowl or dish.
4. Optionally garnish with grated Parmesan cheese.
5. Serve with a fresh loaf of bread, like a baguette or focaccia, for dipping.
Savor this delightful olive oil bread dip as an appetizer or a crowd-pleaser at your next gathering!
Read More
Homemade Pierogi Garnished with Buttery Onions
### Homemade Pierogi: A Family Treasure from Grandma Mary’s Kitchen
These homemade pierogi are a treasured recipe handed down from my Grandma Mary. The delicate dough is stuffed with a savory blend of creamy mashed potatoes and cheese, boiled to perfection, and then pan-fried until golden and crispy. Serve them alongside caramelized onions and a spoonful of sour cream for a delightful side or main dish that captures the spirit of comfort food.
#### What Are Pierogi?
Pronounced ‘puh-row-gee’, pierogi (also spelled pierogie, perogie, or perogy) are a cornerstone of Polish cuisine and a cherished dish throughout Eastern Europe. These dumplings start with a simple flour dough and can be filled with an array of ingredients, from sweet options like blueberries to savory ones such as sauerkraut. The traditional cooking method involves boiling the pierogi until they float, followed by a quick pan-fry to create a crisp outer layer.
This recipe highlights the classic potato and cheese filling, known as pierogi ruskie, which my grandma frequently prepared for our family celebrations. They are best enjoyed with sour cream and caramelized onions.
#### Ingredient Notes
– **Dough**: For the ideal texture, stick to the original ingredients in the dough. This recipe, used by my Polish grandma, does not call for sour cream, ensuring a classic consistency.
– **Filling**: The filling comprises smooth mashed potatoes, cheddar cheese, and finely diced sautéed onions.
– **Potatoes**: Choose starchy types like russet or baking potatoes for a creamy texture.
– **Cheese**: Go for finely shredded cheddar, preferably freshly shredded from a block for enhanced flavor.
– **Seasonings**: Finely dice the white onion and cook it in butter until soft, without letting it brown. My grandma preferred white pepper for a delicate taste, but black pepper is also suitable.
#### How to Make Pierogi
Crafting pierogi is a cherished tradition that can be an enjoyable family activity. Here’s how to do it:
1. **Make the Dough**: Mix flour, eggs, oil, salt, and water in a bowl, stirring until a dough forms. Knead gently until it’s smooth, then let it rest.
2. **Prepare the Filling**: Boil the potatoes until they are tender, sauté the onions in butter, then mash the potatoes and combine them with the onions and cheese. Let the filling cool.
3. **Roll the Dough**: Roll the dough out to 1/8-inch thickness and cut into 3-inch circles.
4. **Fill and Seal**: Spoon a portion of the filling onto each circle, fold it over, and pinch the edges to seal.
#### Cooking and Freezing Pierogi
– **Cooking**: Boil the pierogi in salted water until they float, then pan-fry in butter until golden brown. Serve with sautéed onions and sour cream.
– **Freezing**: Prepare the pierogi and freeze them on a parchment-lined baking sheet. Once they are frozen, transfer them to a zippered bag. They can be cooked straight from frozen.
#### Tips for the Best Pierogi
– Make sure the potatoes are mashed until smooth for a creamy filling.
– Shred your own cheese to maximize flavor.
– Sauté the onions gently to prevent browning.
– Avoid overworking the dough; knead just until it’s smooth.
– Let the dough rest if it springs back while rolling.
#### Conclusion
These homemade pierogi are not merely a dish; they represent a link to family traditions and cherished memories. Whether enjoyed as a side dish or a main meal, they are bound to be a favorite at your table. Relish the experience of making them with your loved ones, just as my grandma did with me.
Read More Honey Butter Coated Carrots: An Easy and Tasty Easter Accompaniment
**Honey Butter Glazed Carrots: A Simple and Yummy Easter Accompaniment**
Easter signifies moments of family reunions, joyful festivities, and certainly, scrumptious dishes. As you curate your Easter offerings, think about incorporating a recipe that is easy to make and guaranteed to please your visitors: Honey Butter Glazed Carrots. This side dish fuses the inherent sweetness of carrots with the decadent flavors of honey and butter, forming an ideal complement to any Easter meal.
**Why Select Honey Butter Glazed Carrots?**
Carrots are a flexible vegetable that not only provide nutrition but also bring a lively touch of color to your dining table. Packed with beta-carotene, fiber, and antioxidants, they are a wholesome choice that pairs well with numerous main courses. The honey butter glaze accentuates their natural sweetness, making them appealing for both adults and kids.
**Ingredients Needed:**
– 1 pound of fresh carrots, peeled and cut into similar-sized pieces
– 3 tablespoons of unsalted butter
– 2 tablespoons of honey
– Salt and pepper for seasoning
– Fresh parsley or thyme for decoration (optional)
**Preparation Steps:**
1. **Prepare the Carrots:** Start by peeling the carrots and slicing them into similar-sized pieces. This guarantees consistent cooking and an attractive presentation.
2. **Cook the Carrots:** Bring a pot of salted water to a boil. Add the carrots and cook for approximately 5-7 minutes, or until they reach tenderness but remain firm. Drain the carrots and keep them aside.
3. **Create the Glaze:** In a large skillet, melt the butter over medium flame. Mix in the honey until it is thoroughly blended with the butter. Let the mixture simmer for a minute or two until it begins to slightly thicken.
4. **Glaze the Carrots:** Introduce the cooked carrots to the skillet, gently tossing them to ensure they are evenly coated with the honey butter glaze. Season with salt and pepper as desired. Continue to cook for an additional 2-3 minutes, allowing the carrots to soak up the flavors of the glaze.
5. **Serve and Garnish:** Move the glazed carrots to a serving platter. For a refreshing touch, garnish with chopped parsley or thyme.
**Success Tips:**
– **Even Sizing:** Slicing the carrots into uniform pieces guarantees even cooking, avoiding some being overcooked while others are underdone.
– **Sweetness Adjustment:** If you prefer a less sweet flavor, cut back on the honey or add a dash of lemon juice for a touch of acidity.
– **Prepare in Advance:** This dish can be made ahead of time. Simply reheat gently in a skillet before serving to keep the glaze smooth.
**Pairing Ideas:**
Honey Butter Glazed Carrots complement a range of main courses beautifully. Think about serving them with roasted lamb, baked ham, or a savory quiche. Their sweet and buttery essence also pairs well with other classic Easter sides like mashed potatoes or green beans.
**Final Thoughts:**
Honey Butter Glazed Carrots are a charming addition to any Easter spread. Their simple preparation and delightful flavor make them a beloved choice for home chefs and guests alike. This year, bring a hint of sweetness to your Easter gathering with this uncomplicated yet sophisticated side dish.
Read More
Creamy Pasta with Chicken and Cowboy Butter Sauce
**Creamy Cowboy Butter Chicken Pasta**
A swift and simple chicken pasta bursting with the flavors of cowboy butter! Cowboy butter is a compound butter filled with garlic, parsley, chives, thyme, lemon juice, Dijon mustard, paprika, and chili flakes, making it delightful on steaks, bagels, and more. It also serves as a delicious sauce for pasta! This recipe captures all the essence of cowboy butter and is incredibly easy to prepare. The process begins with cooking seasoned chicken (in butter), then setting it aside while you sauté onions and peppers. Garlic, thyme, paprika, and red pepper flakes are incorporated before creating the sauce with broth and cream. The finishing touches include Dijon mustard, lemon juice, parsley, and chives, followed by mixing in the pasta for a delightful meal! This creamy cowboy butter chicken pasta is quick and easy to prepare, making it ideal for hectic weeknights and is loaded with flavor; sure to vanish rapidly from plates!
**Prep Time**: 10 minutes
**Cook Time**: 25 minutes
**Total Time**: 35 minutes
**Servings**: 4
**Ingredients:**
– 8 ounces pasta (gluten-free for gluten-free)
– 2 tablespoons butter
– 1 pound boneless and skinless chicken thighs (or breasts), diced into bite-sized pieces
– 1/2 teaspoon onion powder
– 1/2 teaspoon garlic powder
– 1/2 teaspoon (smoked) paprika
– 1/2 teaspoon salt
– 1/2 teaspoon pepper
– 1/4 cup butter
– 1 onion, chopped
– 1 bell pepper, chopped
– 2 cloves garlic minced/grated
– 1 teaspoon thyme, chopped
– 1 teaspoon (smoked) paprika
– 1/2 teaspoon red pepper flakes
– 1 cup chicken broth
– 1/2 cup heavy/whipping cream
– 1 tablespoon Dijon mustard
– 1/2 lemon, juice and zest
– 1 tablespoon parsley, chopped
– 1 tablespoon chives, chopped
– Salt and pepper to taste
**Directions:**
1. Begin cooking the pasta as per the package instructions.
2. In the meantime, melt the butter in a large skillet over medium heat, add the chicken, seasoned with onion powder, garlic powder, paprika, salt, and pepper, and cook for about 10 minutes before removing it from the pan.
3. Incorporate the onion and bell pepper into the skillet and cook until soft, roughly 5-8 minutes.
4. Add the garlic, thyme, paprika, and red pepper flakes, stir, and cook until aromatic, about a minute.
5. Pour in 1/2 cup of the broth and deglaze the pan by scraping any browned bits from the bottom as the broth bubbles.
6. Add the rest of the broth and cream, bring to a boil, then lower the heat and let simmer for 5 minutes.
7. Stir in the Dijon mustard, lemon juice, lemon zest, parsley, and chives before adjusting seasoning with salt and pepper to taste.
8. Combine the cooked and drained pasta and relish your meal!
**Options:**
– Sauté the onion and bell pepper at the same time as the chicken to save a few minutes!
– Turn this into a one-pan dish by incorporating an additional 2 cups of broth in step 6 and cooking the pasta in the pan until done, approximately 10 minutes.
– Mix in 1 tablespoon Worcestershire sauce (gluten-free for gluten-free), together with the broth.
– Incorporate 1/4 cup Parmigiano Reggiano (parmesan cheese), grated, along with the cream.
**Nutrition Facts**: Calories 557, Fat 34g (Saturated 19g, Trans 0.3g), Cholesterol 187mg, Sodium 545mg, Carbs 53g (Fiber 4g, Sugars 6g), Protein 33g.
Read More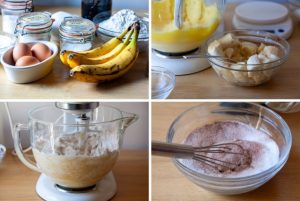
Banana Chocolate Chip Cake Instructions
### Banana Chocolate Chip Cake: A Tasty Variation on a Timeless Recipe
As we look back on almost twenty years since the launch of a cherished family dish, the Chocolate Chip Sour Cream Cake, a wonderful transformation has taken place: the Banana Chocolate Chip Cake. This dessert preserves the core qualities of its forerunner while infusing the cozy, inviting taste of bananas, rendering it an irresistible indulgence for any celebration.
#### The Motive Behind the Recipe
The initial Chocolate Chip Sour Cream Cake is celebrated for its high, soft texture and a crunchy layer of cinnamon sugar on top, enhanced by a generous distribution of chocolate chips. Throughout the years, the thought of modifying this traditional recipe has remained in the creator’s mind, prompting the investigation of different flavors like pumpkin and apple spice. However, it was a moment of necessity—running short on sour cream—that inspired the creative use of mashed bananas, resulting in an overwhelmingly favorable reaction from family and friends.
This revised version of the cake not only retains the cherished traits of the original but also amplifies it with the aromatic and warming undertones of banana. It’s an ideal answer for those overripe bananas resting on your counter, turning them into a delightful dessert that’s bound to be a family favorite.
#### Ingredients
**For the Cake:**
– 3 large eggs, separated
– ½ cup (4 ounces or 115 grams) unsalted butter, at room temperature
– 1½ cups (300 grams) granulated sugar
– 1½ teaspoons vanilla extract
– 1½ cups (375 grams) mashed bananas
– ⅔ cup (160 grams) sour cream
– 3 cups (400 grams) all-purpose flour
– ½ teaspoon ground cinnamon
– 1 teaspoon baking powder
– 1½ teaspoons baking soda
– 1½ teaspoons kosher salt
**For the Filling and Topping:**
– 2 cups (12 ounces or 340 grams) semi- or bittersweet chocolate chips
– ½ cup (100 grams) granulated sugar
– 1 teaspoon ground cinnamon
#### Instructions
1. **Preheat the Oven:** Preheat your oven to 350°F (175°C). Prepare a 9×13-inch baking dish by applying nonstick spray and lining the base with parchment paper.
2. **Prepare the Batter:** In a large bowl, whip the egg whites until they form firm peaks and set aside. In another mixing bowl, cream together the butter and 1½ cups of the granulated sugar until light and fluffy. Incorporate the egg yolks and vanilla extract, mixing until well combined.
3. **Combine Dry Ingredients:** In a separate bowl, mix together the flour, baking soda, baking powder, ½ teaspoon of cinnamon, and salt.
4. **Mix Ingredients:** Blend the mashed bananas into the butter mixture until combined. Gradually introduce half of the flour mixture, then add the sour cream, followed by the remaining flour mixture, mixing until just integrated. Gently fold in the whipped egg whites.
5. **Assemble the Cake:** In a small bowl, mix the leftover ½ cup of granulated sugar and 1 teaspoon of cinnamon. Spread half of the batter evenly in the prepared dish. Sprinkle with half of the cinnamon-sugar mixture and 1 cup of chocolate chips. Dollop the remaining batter over the filling and smooth the top. Finish by sprinkling the rest of the cinnamon-sugar and chocolate chips over the top.
6. **Bake the Cake:** Bake for 35 to 40 minutes, or until a tester inserted into the center comes out clean. Allow the cake to cool in the pan.
7. **Serve:** Once cooled, move the cake to a cutting board and slice it into squares. For optimal results, store the cake at room temperature uncovered to keep the crispy cinnamon-sugar topping.
#### Conclusion
The Banana Chocolate Chip Cake is a delightful modification that revitalizes a classic recipe. Its moist texture, rich flavor, and appealing presentation make it a perfect dessert for gatherings or a simple family treat. Seize the chance to use those ripe bananas and craft a cake that is sure to become a treasured favorite in your household.
Read More
How to Prepare Greek Pizza with Feta Cheese and Veggies
Alex & Sonja: The Culinary Team Behind A Couple Cooks
Introducing Alex and Sonja Overhiser, the energetic pair who have transformed their love for cooking into a flourishing online community. As the creators of two celebrated cookbooks and the founders of the well-known site A Couple Cooks, Alex and Sonja have been motivating home chefs since 2010 with their straightforward, seasonal dishes and contagious passion for the culinary world.
Guided by the belief that cooking should be both attainable and enjoyable, Alex and Sonja embarked on their journey by sharing recipes that are not only tasty but also easy to make. Their website has evolved into a reliable resource for countless original recipes, cooking advice, and meal planning suggestions, all carefully created and photographed by the couple themselves.
What differentiates Alex and Sonja is their dedication to genuineness and family values. As busy parents, they recognize the hurdles of balancing everyday duties while upholding a healthy lifestyle. Their recipes undergo testing not only by them but also by their kids, guaranteeing that every dish is family-approved and enjoyable for everyone.
Their cookbooks further amplify their culinary ideals, presenting readers with a thoughtfully selected assortment of their finest recipes coupled with insights into their cooking methods and personal stories. Through their endeavors, Alex and Sonja have nurtured a community of food lovers who share their passion for cooking and the happiness it brings to daily life.
Whether you’re an experienced chef or a kitchen beginner, Alex and Sonja’s friendly approach and love for food make A Couple Cooks an essential resource for anyone aiming to improve their culinary abilities and savor the experience of cooking together.
Read More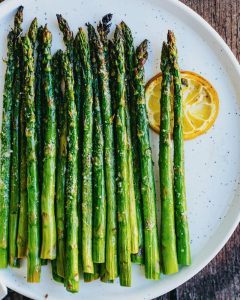
Grilled Asparagus with Citrus Zest
Alex & Sonja Overhiser: The Culinary Pair Behind A Couple Cooks
Alex and Sonja Overhiser are the energetic couple behind the well-known culinary platform, A Couple Cooks. As writers of two praised cookbooks and active parents, they have expertly merged their love for cooking with the challenges of daily life. Their adventure started in 2010 when they established A Couple Cooks to express their passion for uncomplicated, seasonal recipes and the pleasure of cooking together.
The Overhisers have created a strong platform that provides thousands of unique recipes, each made with care and precision. Their website serves as a treasure trove for home cooks, featuring a diverse range of dishes that cater to various dietary needs and occasions. From quick weeknight meals to intricate holiday banquets, Alex and Sonja offer inspiration for every dining experience.
What distinguishes A Couple Cooks is the personal flair that Alex and Sonja infuse into their content. Every recipe is not only penned and photographed by the couple but also tested by their family, ensuring that each dish is both tasty and family-friendly. Their relatability and authenticity resonate with their audience, making cooking accessible and enjoyable for everyone.
Alongside recipes, A Couple Cooks provides useful cooking advice and meal planning suggestions, empowering readers to feel more confident in the kitchen. Whether you’re an experienced cook or just starting, Alex and Sonja’s recommendations aid you in navigating the culinary landscape with confidence.
The Overhisers’ dedication to encouraging healthy, sustainable eating is clear in their emphasis on seasonal ingredients and plant-based dishes. They motivate their readers to appreciate the beauty of cooking with fresh, nutritious ingredients, cultivating a deeper connection with food and its sources.
Through their cookbooks, website, and active social media engagement, Alex and Sonja Overhiser persist in inspiring a worldwide community of food lovers. Their commitment to sharing the joy of cooking as a couple and a family has turned A Couple Cooks into a cherished resource for anyone eager to enhance their culinary journey.
Read More
Easy Eggplant Pizza Recipe
Alex & Sonja: Culinary Innovators and Cookbook Writers
Introducing Alex and Sonja Overhiser, the energetic pair behind the renowned culinary platform, A Couple Cooks. As authors of two celebrated cookbooks, dedicated parents, and an actual couple who shares a love for cooking, Alex and Sonja have significantly influenced the home cooking landscape. Their adventure started in 2010 when they created A Couple Cooks to express their passion for straightforward, seasonal recipes and the joy found in cooking together.
Over time, A Couple Cooks has evolved into an extensive resource for home chefs, featuring thousands of original recipes, insightful cooking advice, and practical meal planning suggestions. Each recipe is carefully designed and photographed by Alex and Sonja, ensuring that their personal touch and culinary knowledge are evident. Their recipes are not only tested by the couple but also by their children, making them friendly for families and accessible to cooks of any expertise.
Alex and Sonja’s cookbooks have solidified their status as trusted voices within the culinary community. Their friendly approach and focus on fresh, seasonal ingredients have connected with readers, encouraging many to discover the pleasures of cooking at home. Whether you’re an experienced chef or a beginner, Alex and Sonja’s contributions offer something appealing for everyone, making the craft of cooking approachable and fun.
In addition to recipes, A Couple Cooks offers valuable insights into meal planning, aiding busy families in tackling the challenges of preparing wholesome and appetizing meals during chaotic times. Alex and Sonja’s dedication to nurturing a love for cooking and sharing meals has built a devoted following, eager to experiment with new flavors and techniques.
In a society where convenience often overshadows quality, Alex and Sonja Overhiser emerge as champions of thoughtful, intentional cooking. Their commitment to crafting nourishing, flavorful dishes and their genuine excitement for sharing these experiences with others continue to motivate and uplift home cooks worldwide.
Read More
Weekly Meal Schedule for March 30, 2026
### Receive Tasty New Recipes Every Day
In the hectic pace of modern life, carving out time to create nutritious and appetizing meals can be challenging. Yet, with the proper tools, you can effortlessly uncover new recipes that not only save time but also excite your palate. Enrolling in a daily recipe service can be transformative for home chefs of all experience levels.
#### Reasons to Enroll in a Recipe Service
1. **Diversity**: A daily recipe subscription introduces you to a broad spectrum of cuisines and cooking methods. This diversity keeps your meals thrilling and avoids the dullness of consuming the same dishes continually.
2. **Ease of Use**: With recipes sent directly to your inbox, you can conveniently organize your meals for the week. This ease of use frees up time for meal planning and grocery shopping.
3. **Skill Enhancement**: Experimenting with new recipes can improve your culinary abilities. You’ll discover fresh techniques and ingredients that can broaden your cooking repertoire.
4. **Healthier Choices**: Many recipe services emphasize healthy eating, offering nutritious selections that can assist you in sustaining a balanced diet.
5. **Connection and Inspiration**: Joining a recipe subscription frequently links you with a community of other cooking fans. Exchanging experiences and tips can motivate you to experiment with new ideas in the kitchen.
#### Steps to Begin
To start receiving tasty new recipes daily, simply sign up for a recipe service. Most services will ask for your email address and may inquire about your preferences regarding dietary needs or preferred cuisines.
For example, you can register for a service that provides a weekly meal plan, ensuring you receive a tailored selection of recipes that match your tastes. Seek out services that allow you to unsubscribe at any moment, offering you the flexibility to opt-out should your needs evolve.
#### Interacting with the Community
After subscribing, feel free to interact with the community. Numerous recipe services maintain social media accounts where you can share your cooking triumphs, seek advice, and gather inspiration from other members. Following these platforms can also keep you informed about new recipes and cooking insights.
#### Final Thoughts
Subscribing to a daily recipe service is a fantastic way to enhance your culinary experience. With an abundance of recipes at your disposal, you can relish the art of cooking while discovering new flavors and techniques. Embark on your culinary adventure today and elevate your meals into delightful experiences!
Read More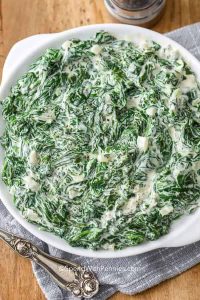
Fast and Simple Steakhouse-Style Creamed Spinach Recipe in 25 Minutes
# Steakhouse-Style Creamed Spinach Recipe
This creamed spinach recipe, reminiscent of steakhouse flavors, is indulgent, velvety, and quick to prepare, making it an ideal accompaniment for any dinner. Cooked in a single skillet and ready in just 25 minutes, the dish achieves its creamy consistency from cream cheese, doing away with the necessity for flour.
## Flavor Profile
– **Rich and Creamy**: This creamed spinach features a luxurious, creamy consistency with notes of sweet onion and flavorful garlic, expertly seasoned for a comforting taste sensation.
– **Convenience**: Skipping the roux and flour means fewer pans to clean, and the cream cheese thickens the mixture swiftly and dependably.
## Serving Suggestions
This adaptable side dish complements an assortment of main courses, including:
– Steak
– Tender chicken
– Pork chops
– Salmon
## Ingredients Overview
– **Spinach**: Fresh spinach is optimal, though frozen spinach can serve as a fast substitute. If using frozen, be sure it’s thawed and excess moisture is removed.
– **Sauce Base**: The sauce centers around cream cheese and heavy whipping cream. For optimal results, use softened full-fat cream cheese.
– **Seasonings**: Basic seasonings like garlic powder and homemade seasoned salt elevate the flavors. Fresh minced garlic can be included when sautéing the onions for added richness.
– **Variations**: For a richer flavor, mix in Parmesan or Romano cheese. A touch of nutmeg or crushed red pepper can introduce warmth.
## How to Make Creamed Spinach
1. **Wilt the Spinach**: Sauté the spinach in a skillet until wilted, then drain thoroughly.
2. **Cook Onions**: In the same pan, cook onions in butter until soft, then incorporate the cream cheese.
3. **Add Ingredients**: Blend in heavy cream, garlic powder, and salt, allowing to simmer until it thickens.
4. **Combine**: Mix the drained spinach into the cream sauce and taste for seasoning before serving.
### Tips for Success
– **For a Thick Sauce**: Make sure the spinach is very dry before incorporating it into the sauce. Use a strainer to eliminate any excess liquid.
– **For a Smooth Sauce**: Cut the cream cheese into cubes to facilitate quicker melting and mix in any cheese off the heat.
– **Prevent Graininess**: Maintain a medium-low temperature after adding the dairy to prevent curdling.
– **Season Later**: Taste after adding the spinach, as it may mute the salt and seasonings.
## Storing, Reheating, and Freezing
– **Storage**: Store any leftovers in an airtight container in the refrigerator for up to 4 days.
– **Freezing**: Can be frozen for as long as 2 months, although the dairy sauce might slightly separate when thawed.
– **Reheating**: Thaw in the refrigerator, then gently reheat on low, whisking to blend. Add a splash of cream or milk if needed.
## Nutritional Information (per serving)
– **Calories**: 121
– **Carbohydrates**: 4g
– **Protein**: 3g
– **Fat**: 10g
– **Saturated Fat**: 6g
– **Cholesterol**: 33mg
– **Sodium**: 160mg
– **Potassium**: 454mg
– **Fiber**: 1g
– **Vitamin A**: 7470 IU
– **Vitamin C**: 21.7mg
– **Calcium**: 93mg
– **Iron**: 2.1mg
This creamed spinach dish delivers steakhouse-quality taste right in your kitchen, making it a wonderful addition to any meal. Relish the decadent, creamy flavor that enhances a variety of main courses!
Read More